XMAX V3 Pro Getting Started Guide: Everything You Need From Day One
The XMAX V3 Pro heats up in 15 seconds, runs a swappable 18650 battery, and supports dosing capsules — features you’d normally find on vaporizers costing twice as much. But none of that matters if you load it wrong, skip the burn-off, or pick the wrong temperature for your first session. This guide covers everything: first-time setup, controls, temperature zones, session vs on-demand mode, dosing capsules, battery swapping, and cleaning — so you get good vapor from your very first draw.
- Always run 2–3 empty heat cycles at 220 °C before your first session — skipping this leaves manufacturing residue in the airpath.
- Start at 185–195 °C (365–383 °F) for your first real session. This hits the “balanced” zone: visible vapor, good flavor, manageable warmth.
- Session Mode lasts longer per charge. On-Demand Mode gives better control for microdosing and mid-session breaks.
- Clean the chamber while still warm after every session — residue takes 30 seconds to wipe then vs. 5 minutes cold.
What Comes in the Box?
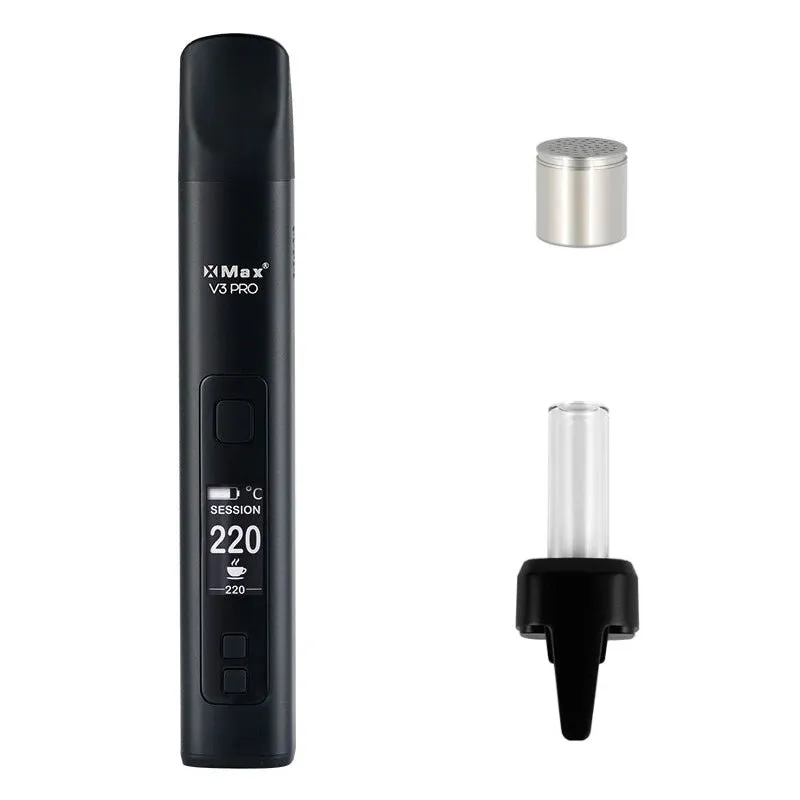
XMAX ships the V3 Pro with everything you need to start — but knowing what each piece does saves time when you’re setting up. The standard box includes the V3 Pro unit, one 18650 battery (partially charged), a USB-C charging cable, a flat mouthpiece, a glass bubbler-style mouthpiece, a cleaning brush, a loading tool, and a spare screen. Some retailers throw in a carrying case.
The two mouthpieces give you options from day one. The flat mouthpiece sits flush for pocket carry. The glass bubbler mouthpiece cools vapor with a small water chamber inside — you add a few drops of water through the side hole before use. Most beginners start with the flat mouthpiece and switch to the bubbler once they’re comfortable with the basics.
The included 18650 battery comes installed but not fully charged. Charge it to 100% before the burn-off in the next step — a full battery makes it easier to complete the recommended heat cycles without running low.
Related: XMAX V3 Pro vs V4 Pro
Why Do You Need to Do a Burn-Off First?
Vaporizers arrive from the factory with trace residues from machining oils, adhesives, and manufacturing coatings inside the chamber and airpath. The V3 Pro is no exception. Running 2–3 empty heat cycles at 220 °C burns these off before they reach your lungs — it’s the equivalent of seasoning a cast-iron pan before cooking.
Here’s how to do it: Press and hold the power button for 3 seconds until the OLED lights up. Set the temperature to 220 °C using the up button. Hold the power button again to begin heating. Wait until the device signals it’s at temperature — the display confirms this. Let it run for a full session cycle (about 4 minutes in Session Mode), then let it cool. Repeat 2 more times. Don’t inhale during this process.
After the third cycle, wipe the inside of the chamber with a dry cotton swab while it’s still warm to remove any visible residue. You’re ready to load.
How Do the Controls Work?
The V3 Pro has four buttons and an OLED display. Once you know what each button does, the interface is genuinely simple — no app needed, no Bluetooth pairing, no firmware updates. Everything happens on the device.
| Button / Action | Function |
|---|---|
| Hold power (3s) | Turn on / off |
| Press power once | Start or pause heating |
| Up / Down buttons | Adjust temperature (1°C per press) |
| Hold Up + Down (2s) | Switch between Session Mode and On-Demand Mode |
| Press power 3× rapidly | Activate boost mode (max temp) |
The OLED shows your current temperature, target temperature, and session timer. The battery indicator sits in the corner. When the device reaches your set temperature, it vibrates once and the display switches from a rising readout to a steady number. That’s your cue to start drawing.
How Should You Load the Chamber?
Grind quality matters more than most beginners expect. Too coarse and airflow bypasses the herb — you get thin vapor and wasted material. Too fine and the screen clogs after a few sessions. A medium-fine grind, slightly coarser than espresso, hits the sweet spot for the V3 Pro’s hybrid chamber.
Fill the chamber fully but don’t pack it tight. The V3 Pro’s hybrid system relies on both conduction (contact heat from the chamber walls) and convection (hot air moving through the herb). Overpacking restricts airflow and kills the convection component — you end up with pure conduction performance at hybrid prices. A gentle tamp that settles the material without compressing it is all you need.
Once loaded, replace the mouthpiece and press the power button to start heating. The device reaches your set temperature in roughly 15 seconds from cold.
See also: XMAX V3 Pro review
What Temperature Should You Start At?
Temperature is the single biggest variable in your experience with the V3 Pro. Lower temperatures preserve terpenes and flavor; higher temperatures produce denser vapor and more intense effects. The V3 Pro’s range of 100–220 °C gives you more control than most budget devices.
Myrcene, the most common terpene in cannabis, vaporizes at 166–168 °C. Linalool (floral, lavender notes) doesn’t appear until 198 °C. Benzene — a combustion byproduct you want to avoid — starts forming above 200 °C (Royal Queen Seeds). So there’s a meaningful case for staying below 200 °C unless you specifically want cloud production.
XMAX V3 Pro Temperature Zones
100–220 °C range / based on terpene boiling points
Flavor
Balanced
Intense
100°C
160°C
185°C
202°C
220°C
α-Pinene 156°C
Myrcene 167°C
Limonene 176°C
Linalool 198°C
Zone
Range
Vapor
Best for
Flavor
160–185°C
Light
Terpene lovers
Balanced
185–202°C
Visible
Best starting point
Intense
202–220°C
Dense
Cloud production
Source: Royal Queen Seeds / terpene chemistry data. Zones are practical guidelines, not hard boundaries.
Our recommendation for first-time users: start at 190 °C. This sits comfortably in the balanced zone — warm enough to produce consistent visible vapor on every draw, cool enough that the flavor isn’t burned off. Once you’ve done a few sessions, nudge up or down by 5 °C increments to dial in what you prefer.
Session Mode vs On-Demand Mode — Which Should You Use?
The V3 Pro runs both Session Mode and On-Demand Mode — and choosing the wrong one for your situation is one of the most common reasons new users are disappointed with their results. These two modes work fundamentally differently, not just in timing.
Session Mode heats continuously for a fixed period (typically 4 or 6 minutes depending on your setting). Once you hit your target temperature, the session runs until the timer ends. This is the more efficient mode — the chamber maintains temperature without the power spikes of repeated on/off cycles, so you get more sessions per battery charge. Draw whenever you want during the timer. Good for a dedicated sit-down session when you know you’ll be using it consistently.
On-Demand Mode activates the heater only when you press the power button. Release the button, and heating stops. This means you can take one draw, set the device down for 20 minutes, then pick it up and get a fresh draw — the herb doesn’t continue cooking between uses. It wastes less material during long breaks, but the battery drains faster because of the repeated heating cycles.
Which to choose? If you’re sitting down for a full session, use Session Mode — it’s more efficient and produces more consistent vapor throughout. If you want to microdose, take occasional single hits, or share with one other person with breaks in between, On-Demand Mode is the better fit.
Switch between modes by holding the Up and Down buttons simultaneously for 2 seconds. The display confirms the mode change.
How Do You Use the Dosing Capsules?
Dosing capsules are one of the V3 Pro’s standout features at this price point — and most new users don’t realize how much they change the daily experience. A dosing capsule is a small stainless steel cup that fits inside the V3 Pro’s chamber. You load herb into the capsule instead of directly into the device.
Why does this matter? You can pre-load 5–10 capsules at home, store them in a small case, and swap them in seconds wherever you are — no fumbling with loose herb on the go. Sessions start cleanly, end cleanly, and the chamber itself stays much cleaner because herb only contacts the capsule. Cleaning frequency drops significantly.
Loading a capsule: fill it about 70–80% and tamp gently. Drop it into the chamber — it should sit flush. The device heats it exactly as it would loose herb. After your session, use the loading tool to lift the spent capsule out (they’re hot — wait a moment or use the tool, not your fingers).
If the capsule lid sticks: this happens when resin bonds the capsule lid to the body between sessions. Heat the capsule lid-side-down during a quick burn-off cycle — the warmth releases the bond without damaging the capsule.
Find accessories: XMAX V3 Pro compatible dosing capsules & accessories
How Long Does the Battery Last, and How Do You Swap It?
The V3 Pro uses a 2600 mAh 18650 lithium-ion battery. Real-world runtime depends on your temperature and mode — expect 6 to 10 full sessions before you need to recharge. Session Mode at 190 °C typically falls at the higher end; On-Demand Mode at 215 °C at the lower end.
The swappable 18650 is the feature that sets the V3 Pro apart from sealed-battery competitors. A spare 18650 cell costs under €10 at any electronics shop. Carry a charged spare and you’ve essentially doubled your runtime without waiting for a charge cycle.
To swap the battery: locate the small fabric tether running along the battery’s side. Pull downward toward the base — this tips the negative end of the battery up and out of the compartment. Lift the battery using the tether, not the positive terminal. Don’t yank or pry. Insert the spare positive-end first, press down until it seats, and you’re back in service immediately.
USB-C passthrough charging means you can use the V3 Pro while it’s plugged in. Not ideal for the battery’s long-term health, but fine when you’re at a desk and running low. A full charge from empty takes roughly 90 minutes.
How Do You Clean the V3 Pro?
Cleaning the V3 Pro takes 2 minutes done regularly — and 20 minutes if you let residue build up for weeks. The rule that makes it easy: clean while the device is still warm after your last session. Spent herb and resin wipe out in seconds when the chamber is at 40–60 °C; the same material sets like glue once it cools.
After every session (2 minutes):
- Remove the mouthpiece and spent herb (use the loading tool if it’s hot).
- Use the included brush to sweep the chamber walls and screen in 3–4 strokes while warm.
- Blow gently through the mouthpiece end to clear any loose particles from the airpath.
Every 5–10 sessions (deep clean, 5–8 minutes):
- Dampen a cotton swab with isopropyl alcohol (90%+ recommended). Wipe the chamber walls in circular motions.
- Clean the screen using the brush or a fine pick — a clogged screen is the most common cause of tight draw resistance.
- Wipe the mouthpiece passage with an IPA-dampened pipe cleaner.
- Let everything dry fully before reassembling (5 minutes for IPA to evaporate).
Don’t submerge any part of the device in liquid. The chamber is ceramic — it handles IPA fine, but the electronics in the body do not tolerate moisture.
Deep dive: Conduction vs. Convection vs. Hybrid
Quick Specs at a Glance
| Heating type | Hybrid (Hybrid) |
| Temperature range | 100–220 °C |
| Heat-up time | ~15 seconds |
| Battery | 2600 mAh 18650, swappable |
| Weight | 107 g |
| Dosing capsules | Yes (Yes) |
| Passthrough charging | Yes (Yes) |
| Warranty | 2 year |
| Current price | From €55 |
Price History (30 Days)
Frequently Asked Questions
Where to Go From Here
The V3 Pro is a strong daily driver that rewards a bit of technique over the first few sessions. Once the burn-off is done and you’ve found your temperature sweet spot, it’s as reliable as vaporizers costing significantly more. The dosing capsule system and swappable battery are the two features worth integrating into your routine as early as possible — they solve the two biggest friction points of portable vaporizing (loading on the go, running out of battery).
Check current prices across all shops: the V3 Pro is currently available from €55 — we track it daily across dozens of European shops so you always find the best deal.
Related guides: XMAX V3 Pro price comparison | V3 Pro vs V4 Pro — which is worth it? | Compare all vaporizers