Butane Vaporisers for Beginners — The Complete Starter Guide 2026
Are you thinking about getting yourself a butane vaporiser, but not quite sure where to start? No problem. This guide takes you by the hand and explains step by step how these devices work, what you need to look out for when buying one, and how to get good results from the outset.
At a glance
- Butane vaporisers work without a battery and without electricity — only with a jet flame lighter
- A DynaVap M7 starts at 35 EUR and weighs 18 grams
- Heating takes under 10 seconds, and the click signals the right temperature
- Beginners should start with the flame at the lower edge of the cap
What is a butane vaporiser?
A butane vaporiser is a vapouriser that works without a battery and without electricity. Instead of electronics, it uses the flame of a gas lighter as its heat source. You heat a metal chamber from the outside until your herbs inside vaporise — all without combustion.
That may sound simple at first, and basically it is. But that very simplicity is part of the appeal: no charging, no waiting for software updates, no worrying about a flat battery while out and about. In return, you get a direct, tactile experience. You feel the heat, hear the click (on some models), and over time learn to use your device blind.
Butane vaporisers have built up a loyal fan base in recent years. Many users swear by the intense flavour and the quick readiness for use — from a cold device to the first draw, it rarely takes more than 10 seconds.
How does the technology work?
The principle is similar across all butane vaporisers:
- Fill the herbs — You put finely ground material into a small chamber (the “oven” or “bowl”).
- Heat — Using a jet lighter, you heat the outside of the chamber or cap. The heat transfers to the inner walls and warms the herbs evenly.
- Vaporise instead of burn — At temperatures between 180 and 230 °C, the active compounds are released from the plant material and form a fine vapor. Unlike smoking, no smoke is produced through combustion.
- Inhale — You draw the vapor in through a mouthpiece.
The key difference compared with smoking: combustion produces tar, carbon monoxide, and hundreds of harmful substances. With vaporising, these are largely avoided because the temperature is much lower. Studies show that vaporising can reduce harmful substance exposure by up to 95% compared with smoking.
The right lighter
With a butane vaporiser, the lighter is just as much a part of the setup as the vaporiser itself. This is one area where it is worth making the right choice from the start.
Single-flame jet lighter — the classic for beginners
To start with, I recommend a single-flame jet lighter (so one with a single nozzle). Why?
- More control: You can direct the flame precisely at one spot and control the heat.
- Better flavour: Slower heating means more even vaporisation.
- Less risk of combustion: With a single flame, you are less likely to overheat the cap.
A double- or triple-flame lighter heats up faster, but is less forgiving of mistakes. An option for later — to begin with, stick to single-flame.
Soft flame vs. jet flame
In short: Use a jet lighter. A normal lighter flame (soft flame) works in theory, but takes ages and is vulnerable to wind. Jet flames are hotter, more focused, and can be used outdoors without any problem.
Use good butane gas
Cheap lighter gas contains impurities that clog your nozzles. Buy filtered butane gas (at least triple-filtered). It costs hardly any more and significantly extends the lifespan of your lighter.
Proven lighter brands
| Brand | Price range | Special feature |
|---|---|---|
| Honest | 5-10 EUR | Reliable, affordable, good starting point |
| Aomai | 3-8 EUR | Compact, often popular as a backup |
| Vertigo | 10-20 EUR | Robust, good flame control |
The first steps with a DynaVap
The DynaVap is by far the most popular butane vaporiser for beginners. The following instructions apply specifically to DynaVap devices, but the basics can also be transferred to other models.
1. Fill the bowl
Grind your herbs medium to fine and fill the bowl (the tip of the DynaVap). Two golden rules:
- Do not pack it too tightly — the air needs to be able to flow through.
- Do not overfill it — the material should finish level with the rim or stay slightly below it.
A loosely filled bowl gives better flavour. A firmly packed bowl produces denser clouds, but requires more experience.
2. Heating
Hold the flame to the lower third of the cap and rotate the DynaVap slowly between your fingers. Even rotation is the key to good vapor production.
After 5 to 10 seconds, you will hear a distinct click — this is a small bimetal disc in the cap signalling to you that the right temperature has been reached.
3. Inhaling
As soon as you hear the click, remove the flame and draw slowly and evenly through the mouthpiece. The DynaVap has a small hole on the side (the “airport”):
- Cover the airport = more resistance, denser vapor
- Leave the airport open = airier draw, milder flavour
- Alternate = opening and closing the airport during the draw gives the best results
4. Wait for the cool-down click
After inhaling, the cap cools down and you hear another click. Only after this second click may you heat it again. If you keep heating before that, you risk combustion.
5. What you can expect
On the first heating cycle, there is often only a little visible vapor. That is normal — the flavour is still there. From the second heating cycle onwards, the vapor becomes denser and warmer. Most users get 3 to 5 cycles per bowl filling.
Common beginner mistakes
Almost everyone makes the same mistakes at the start. Here are the five most common ones — and how to avoid them:
1. Heating too close to the tip of the cap
If you aim the flame at the tip of the cap instead of the middle or lower third, it clicks too early. The herbs are then not properly hot yet, and you get hardly any vapor. Solution: Aim the flame at the lower third of the cap.
2. Ignoring the cool-down click
The most common reason for burnt material: you continue heating immediately after inhaling without waiting for the cooling click. The cap is still hot, the next heating goes too far — and instead of herbal aroma, you taste burnt popcorn. Solution: Be patient. Always wait for the second click.
3. Drawing too hard
Many beginners draw on a DynaVap as if it were a cigarette — hard and fast. That does not work here. The strong airflow cools the chamber and gives you less vapor. Solution: Draw slowly and evenly, as if you were sipping through a straw.
4. Packing the bowl too full
An overfilled bowl does not let air through. Without airflow, there is no vaporisation. Solution: It is better to fill a little less and keep it loose.
5. Using a normal lighter
Yes, in theory it works with a BIC lighter. In practice, it takes three times as long, does not work at all in the wind, and blackens the cap with soot. Solution: Get a jet lighter. Prices start at 5 EUR.
The best beginner models
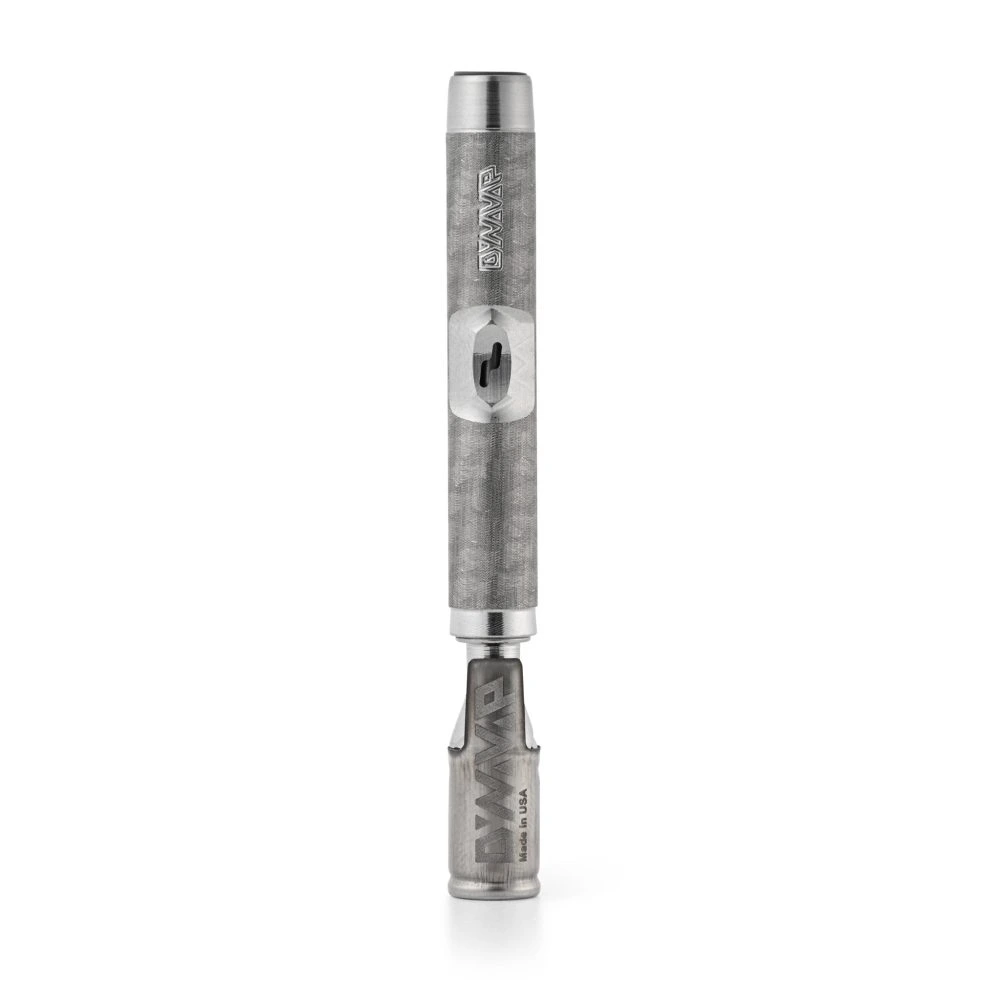
DynaVap M7
The gold standard among butane vaporisers. With its seventh generation, DynaVap’s M series has got everything right: robust stainless steel body, tactile click feedback, and a price that remains fair. If you only want to buy one device and find out whether butane vaporisers are for you — this is the answer.
DynaVap B / B2
Even cheaper than the M series and still fully capable. The body is made of plastic rather than metal, making the device lighter and protecting your lips from heat. Perfect if you want to try it out on a small budget first.
DynaVap G3
For anyone who places special value on flavour. The glass body provides pure, unadulterated vapor and also looks great. Slightly more fragile than the metal models, but in terms of flavour it is in a different league.
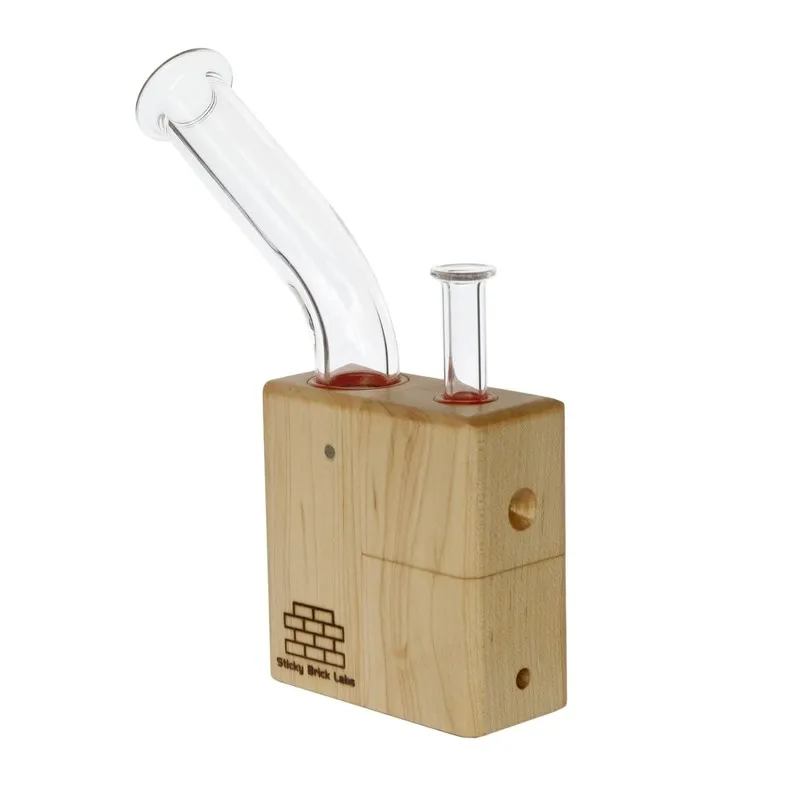
Sticky Brick Runt
A completely different concept: instead of a small cap, here you heat an airflow passing through a wooden block with a glass chamber. Larger bowl, stronger effect, but also a steeper learning curve. For anyone who wants a bit of adventure from the very start.
What else you need
Besides the vaporiser itself, there are a few things that complete your setup:
- Jet lighter — see above. Ideally buy two straight away (one as a backup).
- Storage — DynaVap offers suitable sleeves and cases. But any small tube or tin will do as well.
- Cleaning accessories — isopropyl alcohol (at least 90%), cotton buds, and pipe cleaners. A quick clean once a week is enough.
- Grinder — an herb grinder with a medium grind. Too fine clogs the screen, too coarse vaporises unevenly.
Comparison table: Top 5 beginner models
| Model | Price (approx.) | Difficulty | Flavour | Special feature |
|---|---|---|---|---|
| DynaVap M7 | 80-95 EUR | Easy | Very good | Best all-rounder, stainless steel |
| DynaVap B2 | 35-50 EUR | Easy | Good | Cheapest entry point |
| DynaVap G3 | 90-110 EUR | Easy | Excellent | Glass body, pure flavour |
| Sticky Brick Runt | 110-140 EUR | Medium | Very good | Wood, large bowl, powerful |
| DynaVap VonG | 80-100 EUR | Easy | Very good | Compatible with water pipes |
Prices vary depending on the shop and offer. You can find current prices in the price comparison on vapochecker.com — where offers from more than 77 shops in 23 countries are compared.
Price history
Conclusion
A butane vaporiser is the most direct route to vaporising: no charging, no waiting, no technical gimmicks. You only need the device, a good lighter, and a few minutes of practice. The learning curve is manageable — after three or four sessions, you will have the hang of it.
My tip for getting started: get a DynaVap M7 or, if your budget is tight, the B2. Add a single-flame jet lighter and good butane gas. With that, you are very well equipped.
And if you want to know where your preferred model is cheapest right now: on vapochecker.com you will find the current price comparison with offers from all over Europe.
Has been testing and comparing vaporisers on VapoChecker since 2020. 800+ devices, 274 shops, 51 countries.